Sharepoint

Generic filters

Getting started with Sharepoint

While OneDrive is great for personal files or collaborating with another colleague, but what happens when you need to work in a bigger team

or school setting? Sharepoint simplifies this problem so everyone has the same out-of-box permissions. Best of all, it integrates

seamlessly with Teams.

Alternatively, we have provided links to Microsofts support site for video tutorials as well.

What’s Sharepoint all about, anyways?

While OneDrive is fantastic for personal work storage, SharePoint offers several distinct benefits:

  • Organizationally-Owned Data (No “Orphaned” Files): When an employee leaves a company, their personal OneDrive is eventually deactivated. Files stored on SharePoint belong to the school or department, meaning critical district resources are never lost due to staffing changes.
  • Seamless Microsoft Teams Integration: Every time you create a channel in Microsoft Teams, a SharePoint site is automatically generated behind the scenes. The “Files” tab in your Teams chats is actually powered by SharePoint!
  • Granular Permission Control: You can granular access. For example, a “School Site” can be visible to all school staff, but not available to other staff or students.
  • Advanced Version History & Audit Trails: SharePoint tracks every single save. If someone accidentally overwrites a complex Excel spreadsheet, you can view the complete version history, see exactly who made the change, and restore a previous version with a single click.

Step 1: Log Into Microsoft 365

  1. Open your web browser and go to office.com
  2. Sign in with your @sd79.bc.ca email address & password.

Step 2: Open the SharePoint App

  1. Look at the app launcher sidebar on the left side of your screen (waffle).
  2. Click the SharePoint icon (the teal/green icon with an S and overlapping circles).
    • Note: If you don’t see it, click More Apps.

Step 3: View Your Sites

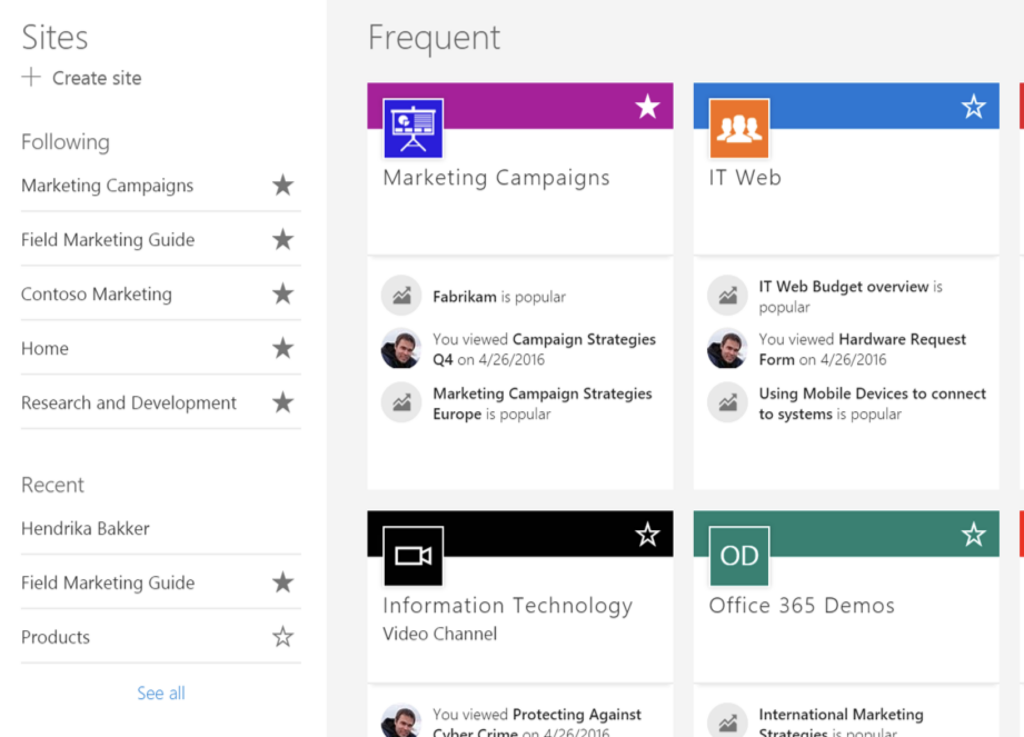
Once the SharePoint start page loads, look at the left sidebar or the main dashboard to see your sites categorized:

  • Following: You can pin Sharepoint’s you’ll use frequently.
  • Recent: A chronological list of the sites you have visited or opened files from most recently.
  • Frequent: Sites that Microsoft detects you interact with the most based on your team activity.

Quick Tip: If you are looking for a specific department site that isn’t appearing on your dashboard, just use the Search bar at the very top of the SharePoint page. Typing the name of the Sharepoint (e.g., “QSS” or “Summer Break”) will pull up the site instantly, and recommend clicking the Star icon (Follow) in the top right of that site to make sure it permanently stays on your dashboard.

So what if you want to create files, folders & collaborate with Sharepoint just like you do with OneDrive? The good news is, you can.

Creating a shortcut is the best way to bring a SharePoint folder into your personal OneDrive workspace. This lets you access team files on your Mac’s Finder sidebar without having to sync the entire SharePoint site!

Here is the quick step-by-step process:

Step 1: Open the SharePoint Folder Online

  1. Access SharePoint via your web browser and navigate to the specific team site you belong to.
  2. Click on Documents (or the specific document library you need).
  3. Open the folder you want to link to your OneDrive.

Step 2: Add the Shortcut

  1. Look at the top menu bar.
  2. Click the Add shortcut to OneDrive button.
    • Alternative: If you are looking at a list of folders, hover your mouse over the folder, click the circle to select it, and click Add shortcut to OneDrive from the top menu.

Step 3: Access It on Your Mac

  1. Give it a few seconds to sync.
  2. Open Finder on your Mac and click on your OneDrive folder.
  3. You will now see the SharePoint folder listed alongside your personal folders.

Pro-tip: You can easily tell it’s a SharePoint shortcut because the folder icon will have a small link/chain icon over it. This tells you that while it looks like it’s in your OneDrive, any changes you make inside that folder are actually updating in the shared SharePoint site for the whole team.

Method 1: Add People to the Entire Site (Best for Team Members)

PS: You must be a Site Owner or have administrative permissions to do this.

  1. Open your SharePoint site in a web browser.
  2. Look at the top right-hand corner of the page and click on Settings (the gear icon).
  3. Select Site permissions from the menu.
  4. Click the Invite people button.
  5. Choose how you want to add them:
    • Add members to group: This adds them to the main team (they get full access to the site, files, and connected conversations).
    • Share site only: This gives them access to the files and pages, but doesn’t add them to the official Microsoft 365 Outlook/Teams group.
  6. Type their @sd79.bc.ca email addresses, choose their permission level (e.g., Edit or Read), and click Save or Add.

Method 2: Share Just a Specific Folder or File (Best for Guests/Temporary Access)

If you don’t want a colleague browsing the whole site, you can just give them access to a single folder. This is where the power of Sharepoint comes into play.

  1. Go to the Documents section of your SharePoint site.
  2. Hover over the folder or file you want to share, and click the three vertical dots (or click the Share icon that looks like an arrow jumping out of a box).
  3. Select Share.
  4. Type the @sd79.bc.ca email addresses of the people you want to add.
  5. Click the Pencil icon to set their permissions (Can edit or Can view).
  6. Click Send.

Mac Finder Shortcut: If you have synced this SharePoint site to your Mac’s Finder (or added it as a OneDrive shortcut), you don’t even need to open your browser. Just right-click the folder directly inside Finder, select Share, and type their @sd79.bc.ca email address there. Cool, hey?

SharePoint allows multiple people to open and edit the same document at the very same time. This feature is called co-authoring.

Here is a quick summary of how it works and how to see what others are doing:

How to Co-Author a Document

You don’t need to turn on any special settings to make this work – this is a built-in feature of Sharepoint.

  1. Open any Word document, Excel spreadsheet, or PowerPoint presentation stored in your SharePoint library.
  2. If a colleague opens that same file, you will instantly see their name or a colored profile bubble appear in the top right corner of the app window. Woot.

What You’ll See on the Screen

As you work together, SharePoint tracks everyone’s changes in real-time:

  • In Microsoft Word: You will see a colored cursor moving across the page with your colleague’s name attached to it. You can watch them type sentence-by-sentence.
  • In Microsoft Excel: The specific cell your colleague has clicked on will be outlined in their assigned color, blocking you from accidentally typing over their active cell.
  • In Microsoft PowerPoint: You will see an icon next to the specific slide thumbnail on the left sidebar showing you which slide your teammate is currently designing.

Things to Keep in Mind

  1. Use updated App Versions: Co-authoring works flawlessly if everyone opens the file in Office for the Web (via their browser) or using the latest Microsoft 365 Desktop Apps on Mac. If someone is using a very old, outdated version of desktop Office, the file might lock them out. Contact our Helpdesk if you suspect this may be the case.
  2. Avoid “Check Out”: If someone right-clicks a file in SharePoint and selects More > Check Out, they are deliberately locking the file so they can work on it exclusively. No one else can edit it until they “Check In” the file again.

Staff members are restricted from creating new SharePoint sites by default. This guardrail is in place to keep the district’s digital infrastructure secure, organized, and properly backed up.

If your team or school requires a brand new SharePoint site, please take note of the following steps:

Step 1: Gather Your Site Details

Before reaching out, make sure you have the following details ready for the Tech Department:

  • Proposed Site Name: (e.g., “Maple Elementary Grade 4 Team” or “District Inclusive Learning Hub”).
  • Site Purpose: A brief description of what the site will be used for.
  • Primary Owners/Managers: The names of the staff members who will be responsible for managing permissions and membership for the site.

Step 2: Request the Site via Technology Services ticket

Because you cannot create the site yourself, you will need to submit a formal request to the help desk:

  1. Log into the district’s staff portal and navigate to Technology Services.
  2. Submit a Support Ticket: Do not email your request; use the official ticketing system.
  3. Select the appropriate category for Microsoft 365/SharePoint requests, fill out your site details, and submit the ticket.

Once the Tech Services team reviews and approves your request, they will provision the site, assign you as the Site Owner, and hand over the keys so you can begin organizing your files and inviting your colleagues.

Alternatively, Microsoft has a wealth of video walkthroughs for both MacOS, PC & mobile.